This one is for all my business babes out there! Let’s talk about how to create a budget for your business!
I’ve been preaching for a few years on here about our family budget and how important it is to our day to day running of things in our life. So why on earth I’ve been running a business, for yearrsssss, without a budget, is baffling to me. I’ve basically just been winging it every month and praying that I can cover my monthly business expenses out of the excess of my business income. I’ve always had the mindset of “Oh, if I want to do that, I’ll just do some extra VA work here and there” when in reality it should have been like “Nope, that is not in the budget this month, but let me save up for a month or two and come back to it.” Oy vey.
Needless to say this hapless tactic left me feeling constantly behind and disorganized in my business. So once I started getting serious about monetizing my blog and my social media platforms (AKA using them to create an income stream) I knew I had to get serious about what was going to happen with that money once it came in every month. Here is how I created a budget for my business!
How to Create a Budget for Your Business
Understanding your Income & Outgo
First of all, you have to understand and know what all of your income streams are and what your expenses are. When it comes to a business income and expenses, they are completely different from your household income and expenses sometimes in that things are annual, instead of monthly, and your income streams probably vary quite a bit based on seasons and activity.
For me this meant taking a look at all of my business income and expenses as a whole over the previous 12 months so that I could really get an idea of what to expect on a monthly basis and not miss any expenses that were going out.
In previous years, I would always add up my business income at the end of the year for our income taxes and be shocked at how much I had made! While we were paying off debt, I knew where all that money was going (towards our debt snowball), but now that we are on to Baby Step 3, I wanted to reallocate some of those funds to help grow my business (as well as add to our family income) so in addition to looking at the past, I also started to think about the future of the business as well and started making decisions based on my goals for the business.
Step One: Getting Organized
The first thing you’ll really need to do is make a list of all your income streams. As online business owners, this can be a really long list, so be sure to be exhaustive when making it.
- Advertising Revenue (through advertising networks, etc)
- Affiliate Income
- Partnership Income (from partnering with brands and companies)
- Revenue from the sale of classes, courses, and membership fees.
- Revenue from the exchange of a service
- Freelancing/Ghost writing
Basically any penny of income that you get for your business needs to be tracked and recorded. Got your list? Great – let’s move on to expenses!
The bad news is, running a business can get expensive really quick, especially if you’re not keeping track of where all that money is going every month. The good news is, business expenses are a tax write off, so it is SUPER important to keep track of them not only so you can budget, but also so you can write them off at the end of the year!
Some of my regular business expenses are:
- Annual Expenses:
- Website hosting
- Domain Privacy
- Stock Photography Membership Fees
- Domain Ownership
- Email Service
- Tailwind for Pinterest Management
- Quarterly Expenses:
- Quarterly Income Tax
- Monthly Expenses:
- Website Security
- Advertising (through Facebook and giveaways)
- Clothes
- HP Instant Ink
- Paid staff (virtual assistant, photographer, intern, babysitter, etc)
- Irregular Expenses:
- Office Supplies/Equipment
- Shipping Fees
- Travel for Conferences
- Gifts
- Meals
There is no way that this is an exhaustive list, but going through the last few months of my budget helped me think of a few things I was missing.
Once you have both of these lists made, it is really as easy as taking your monthly income and subtracting your monthly expenses from that – but doing it every single month. Of course, were it starts to get tricky is planning for those annual expenses and trying to figure out budgeting your income when sometimes it takes up to 90 days (maybe even longer) for you to get it!
Step Two: Setting Up Your Budget
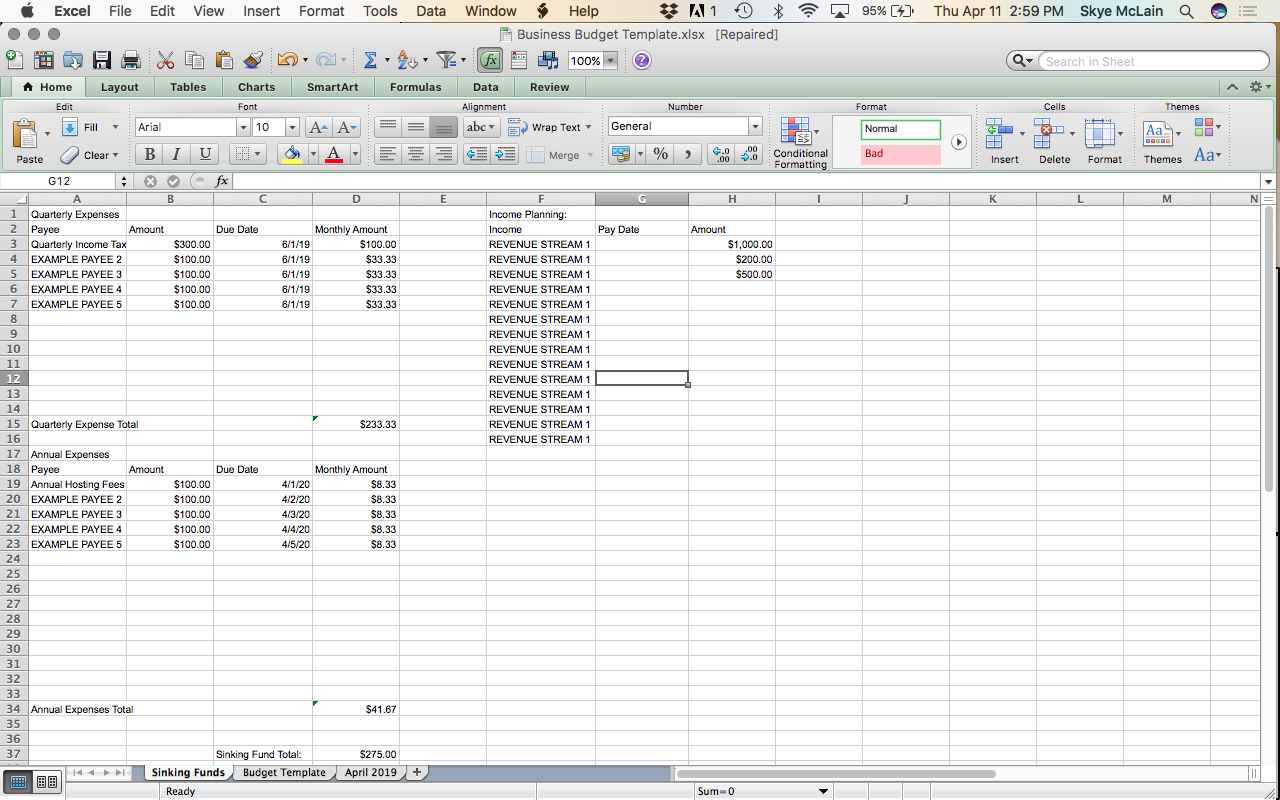
You have the freedom to make this as easy or as complicated as you’d like. I would say that my method falls a little in the middle between these two, into that “doable, but requires a lot of Excel spreadsheet formulas” area. (Don’t worry, I’ve got a template for you at the end of the post!) Here is how mine is set up:
I, like many of you, have a variable income AND a set income each month. So I base my business budget off of the set income that I receive each month and everything else serves as lagniappe (extra, gravy on the biscuit, for those not living in southern Louisiana) that goes into our family budget (and generally our emergency fund).
Since my total income is variable though, I like saving up and preparing for annual expenses, like the membership fee to my stock photography website and website hosting, so that when those expenses come up, they don’t wreck the rest of my budget for that month. I break my expenses down like I did above into Annual, Quarterly, and Monthly expenses.
My spreadsheet is broken up into tabs – one for all of my expenses in one list, divided up into annual, quarterly, and monthly sections, called Sinking Funds (more on why in a second), one for a master template of the budget, and one for each month, where I copy the master template to and customize for that month.
Step 3: Sinking Funds
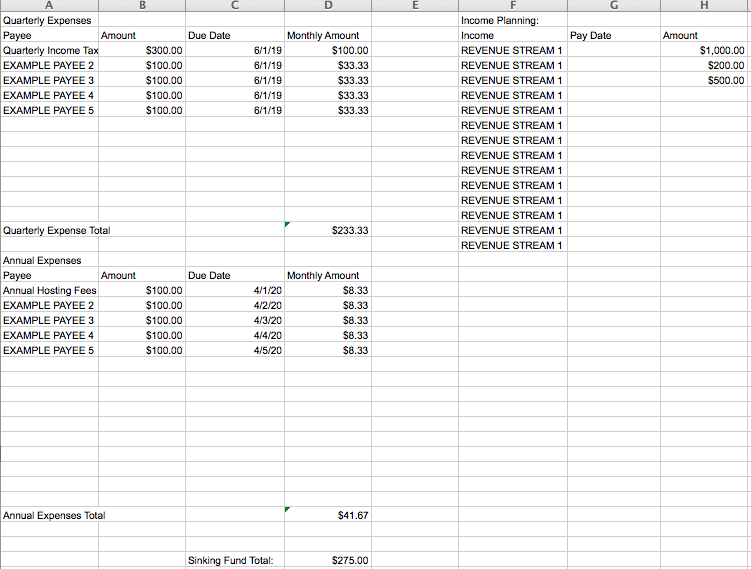
In the Sinking Funds tab, for each expense I have a column for the payee, the amount, the due date, and then the last column has the amount divided by how many months until it is due so that I have a small amount each month that I set aside to save up for that month. That column has a sum total at the bottom so that I have an amount automatically calculated for each month to set aside.
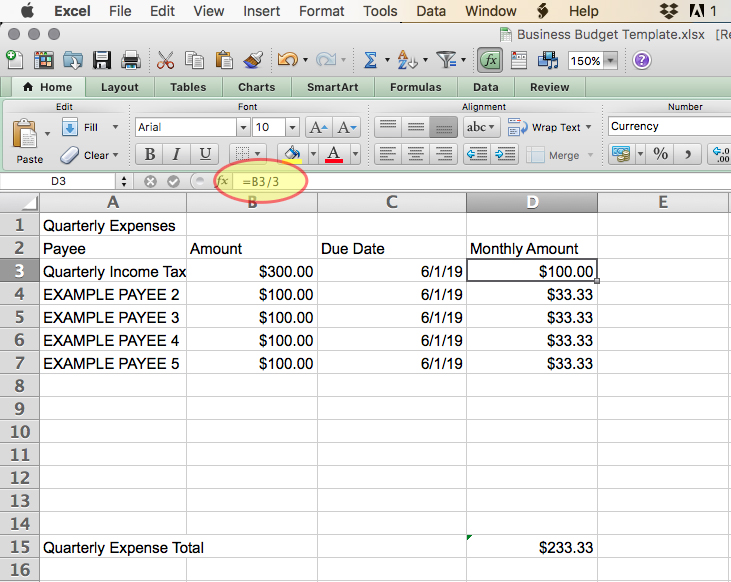
So for example, for my quarterly income taxes, which are currently $280, I have that amount divided by three (since there are three months in each quarter), and each month, I set aside a third of the total to save up.
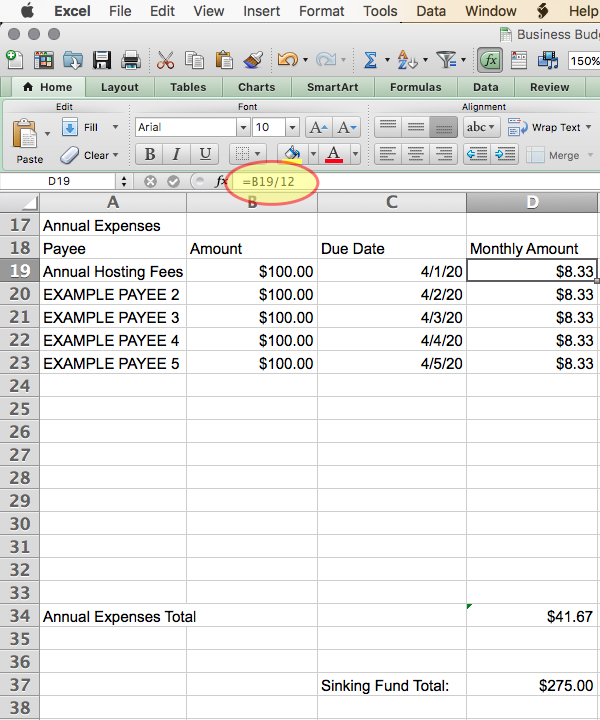
For my annual hosting fees, which are $89.40, I have that divided by 12 so that I set aside 1/12th of that total each month to save up. Each month, I take the sum from that column and add it to my monthly budget, in a “Sinking Funds” line item.
Monthly expenses are not included in this total since they are paid monthly – I just make them their own item in the monthly budget tab (like my advertising and clothing budget).
Setting up this part of the spreadsheet will take the longest, since it is a little complicated and you will need to change the timing on some things. If you set this up in April, and you have an annual fee that is due in June, you’ll need to set that up differently for now, and then change it once you pay it.
For example, say your hosting bills you in June, and you set this spreadsheet up in April. If your annual hosting fees are $100, then for the months of May and June, you’ll have to set aside $50 each month to cover the fee. But, after that, you’ll have to remember to go in and change that up to save 1/12th of the amount each month ($8.33) going forward.
Step Four: Master Budget Template
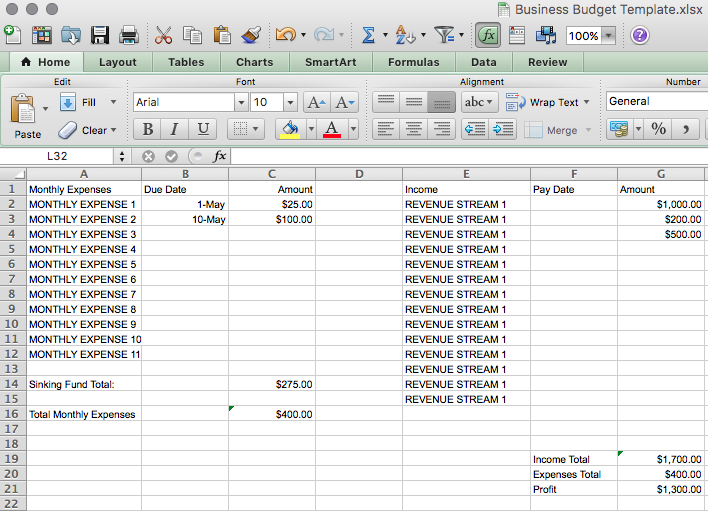
On my master budget template (the one that I make a copy of and customize for each month), it has two sections, one on the left for expenses, and one on the right for income.
On the expenses side, I have line items for individual monthly expenses: my site security fee, and a previously decided upon budget for advertising, clothing, and any other one-off expenses like traveling, meals out, or office equipment. There is also a line item for my sinking fund total for that month, where I input how much I need to save for to cover the items in my sinking fund.
On the income side, I have a column for my income streams on one side, the day they are typically paid out, and then the amount that is coming in for that month. I usually fill these in as I go, as most of them vary month-to-month.
Beneath my expenses, I have a total box for my income, and a total box for my expenses. Once I add up all the income and subtract that month’s expenses from it, the remainder of my income gets transferred over into our personal checking account and that is what I consider my income for the month into our family/personal budget.
I make a copy of this master template each month (and label it with the month/year in the tab) and then customize it from there.
Step Five: Making Changes and Flexibility
Just as it is important to create a budget for your personal and family expenses each and every month, your business expenses will change every month, so you have to be sure to set up a new budget every month.
For instance, for the month of April I don’t have any travel planned and I’m not planning on having any business meals or office expenses come up. HOWEVER, life happens, schedules change, and things can pop up, so I’ve learned that my business budget does need to have some room to flex in it. There are two ways that I can do that.
First, you can create a Flex line item in it, and depending on what your income level is, you can put a set amount in it (anywhere from $100 to $1000, or more, if you’re bougee or have the income to do it!). That amount can roll from month to month and you can use it or not! That way you keep some wiggle room your budget for that random coffee date to talk shop, new printer cartridges, or a last minute opportunity to travel.
The other option is to add the line item into your budget for that month, and decrease the income that is leftover and would go into your personal income (or business savings, however you want to work it). I have done it both ways, and prefer to just add it into the budget for the month.
Now, I know that the DOING of all of this is probably pretty overwhelming! But just remember this – the set up is going to take you a couple of hours to sort out, because going through all of your expenses and trying to make sure you remember everything does take time. But once you have the Sinking Funds tab and the Master Budget Template set up, it will take less than ten minutes each month to budget for your business.
Those ten minutes will be the most important ones you give to your business each month and it will likely give you peace of mind and make you feel much more in charge of your business.
To help make it a little easier, I’ve created a template that you can download and customize for your blog or business.
CLICK HERE TO DOWNLOAD YOUR FREE BUSINESS BUDGET TEMPLATE
I hope that you found this post helpful and that it empowers you to take control of your business finances and start putting that income to good use each month! If you enjoyed this post and found it helpful, I would love it if you shared it on Pinterest, Facebook, or Twitter!

